安装DSS平台
准备环境
| 名称 | 版本 | 地址 | 备注 |
|---|---|---|---|
| Centos | 7.9 | https://mirrors.aliyun.com/centos/7/isos/x86_64/CentOS-7-x86_64-DVD-2009.iso | |
| Java | 1.8 | yum install java-1.8.0-openjdk |
直接使用 yum 命令安装 java1.8 |
| Spark | 3.2.1 | https://archive.apache.org/dist/spark/spark-3.2.1/spark-3.2.1-bin-hadoop3.2.tgz | 需要包括使用包含 hadoop 的下载包,否则不包含连接 hive 的 jar 包 |
| Hadoop | 3.3.4 | https://archive.apache.org/dist/hadoop/common/hadoop-3.3.4/hadoop-3.3.4.tar.gz | |
| Hive | 3.1.3 | https://archive.apache.org/dist/hive/hive-3.1.3/apache-hive-3.1.3-bin.tar.gz | |
| MySQL | 8.0.28 | https://repo.huaweicloud.com/mysql/Downloads/MySQL-8.0/mysql-8.0.28-el7-x86_64.tar.gz | |
| MySQL JDBC 驱动 | 8.0.28 | https://downloads.mysql.com/archives/get/p/3/file/mysql-connector-java-8.0.28.tar.gz | |
| Linkis | 1.4.0 | http://61.183.254.91:43000/skydrow/linkis | |
| Dss | 1.1.2 | http://61.183.254.91:43000/skydrow/DataSphereStudio |
安装基础环境
安装 Java
首先修改 yum 原始源为阿里云源
//备份原始yum配置文件
sudo cp /etc/yum.repos.d/CentOS-Base.repo /etc/yum.repos.d/CentOS-Base.repo.backup
//下载阿里云源配置文件
wget -O /etc/yum.repos.d/CentOS-Base.repo https://mirrors.aliyun.com/repo/Centos-7.repo
//清除yum缓存并更新
sudo yum clean all
sudo yum makecache
然后下载 java1.8
sudo yum install java-1.8.0-openjdk java-1.8.0-openjdk-devel
验证是否安装成功
[root@localhost opt]# java -version
openjdk version "1.8.0_412"
OpenJDK Runtime Environment (build 1.8.0_412-b08)
OpenJDK 64-Bit Server VM (build 25.412-b08, mixed mode)
配置 java 环境
vim /etc/profile.d/java.sh
export JAVA_HOME=/usr/lib/jvm/java-1.8.0-openjdk
export PATH=$JAVA_HOME/bin:$PATH
应用环境变量 source /etc/profile
配置 tmux(可选)
tmux 是一个终端复用器(terminal multiplexer),它可以在一个终端窗口中创建、管理和切换多个独立的会话窗口和面板,同时支持会话持久化。即使断开了终端会话,tmux 中运行的任务也不会停止,用户可以重新连接,继续工作。
下载 tmux
yum -y install tmux
//配置tmux可以滚动
vim ~/.tmux.conf
//添加一
setw -g mode-mouse on
//应用配置
tmux source-file ~/.tmux.conf
创建 Hadoop 用户
sudo groupadd hadoop
sudo useradd -g hadoop hadoop
配置 sudo 权限
//添加/etc/sudoers写权限
chmod +w /etc/sudoers
vim /etc/sudoers
//添加一句
hadoop ALL=(ALL:ALL) ALL
//退出文件后修改/etc/sudoers权限
chmod -w /etc/sudoers
验证本机 hadoop 环境
[hadoop@localhost opt]$ hdfs dfs -ls /
Found 1 items
drwx-wx-wx - root supergroup 0 2025-01-13 20:59 /tmp
配置 localhost 免密登录
//创建密钥
ssh-keygen
//一路按Enter就行
cat ~/.ssh/id_rsa.pub >> ~/.ssh/authorized_keys
chmod 600 ~/.ssh/authorized_keys
验证 localhost 是否免密登录
ssh localhost
安装 MySQL
参考安装MySQL
安装 Hadoop
参考安装Hadoop
安装 Hive
参考安装Hive
安装 Spark
参考安装Spark
安装 Linkis
创建 Linkis 目录
su hadoop
sudo mkdir -p /opt/linkis
sudo cp apache-linkis-1.4.0-bin.tar.gz /opt/linkis/
sudo chown -R hadoop:hadoop /opt/linkis
cd /opt/linkis
tar zxvf apache-linkis-1.4.0-bin.tar.gz
新建 MySQL 的 dss 库以及 dss 用户
mysql -u root -p
CREATE USER 'dss'@'%' IDENTIFIED BY '123456';
create database dss;
flush privileges;
创建 linkis 应用文件夹
sudo mkdir -p /appcom/Install
sudo mkdir -p /appcom/config
sudo mkdir -p /appcom/tmp
sudo chown -R hadoop:hadoop /appcom/
创建 Spark 及 Hive 软链接
ln -s /opt/hive /appcom/Install/
ln -s /opt/spark /appcom/Install/
ln -s /opt/hadoop /appcom/Install/
ln -s /opt/hive/conf /appcom/config/hive-config
ln -s /opt/spark/conf /appcom/config/spark-config
ln -s /opt/hadoop/etc/hadoop /appcom/config/hadoop-config
修改 linkis-env 配置
deploy-config/linkis-env.sh
#!/bin/bash
#
# Licensed to the Apache Software Foundation (ASF) under one or more
# contributor license agreements. See the NOTICE file distributed with
# this work for additional information regarding copyright ownership.
# The ASF licenses this file to You under the Apache License, Version 2.0
# (the "License"); you may not use this file except in compliance with
# the License. You may obtain a copy of the License at
# http://www.apache.org/licenses/LICENSE-2.0
# Unless required by applicable law or agreed to in writing, software
# distributed under the License is distributed on an "AS IS" BASIS,
# WITHOUT WARRANTIES OR CONDITIONS OF ANY KIND, either express or implied.
# See the License for the specific language governing permissions and
# limitations under the License.
#

#
# description: Starts and stops Server
#
# @name: linkis-env
#
# Modified for Linkis 1.0.0

# SSH_PORT=22

### deploy user
deployUser=hadoop
##If you don't set it, a random password string will be generated during installation
deployPwd=


### database type

### choose mysql or postgresql, default mysql

dbType=mysql

export dbType


##Linkis_SERVER_VERSION

LINKIS_SERVER_VERSION=v1


### Specifies the user workspace, which is used to store the user's script files and log files.

### Generally local directory, path mode can be [file://] or [hdfs://]

WORKSPACE_USER_ROOT_PATH=file:///opt/linkis/logs

### User's root hdfs path, path mode can be [file://] or [hdfs://]

HDFS_USER_ROOT_PATH=hdfs:///tmp/linkis


### Path to store started engines and engine logs, must be local

ENGINECONN_ROOT_PATH=/appcom/tmp

###path mode can be [file://] or [hdfs://]

#ENTRANCE_CONFIG_LOG_PATH=hdfs:///tmp/linkis/


### Path to store job ResultSet

### path mode can be [file://] or [hdfs://]

RESULT_SET_ROOT_PATH=hdfs:///tmp/linkis


##YARN REST URL spark engine required

# Active resourcemanager address needed. Recommended to add all ha addresses. eg YARN_RESTFUL_URL="http://127.0.0.1:8088;http://127.0.0.2:8088"

YARN_RESTFUL_URL="http://192.168.122.24:8088"


## request Yarn resource restful interface When Yarn need auth by user

## If your environment yarn interface can be accessed directly, ignore it

#YARN_AUTH_ENABLE=false

#YARN_AUTH_USER=hadoop

#YARN_AUTH_PWD=123456


## request spnego enabled Yarn resource restful interface When Yarn enable kerberos

## If your environment yarn interface can be accessed directly, ignore it

#YARN_KERBEROS_ENABLE=true

#YARN_PRINCIPAL_NAME=yarn

#YARN_KEYTAB_PATH=/etc/security/keytabs/yarn.keytab

#YARN_KRB5_PATH=/etc/krb5.conf


##############################################################

#

# NOTICE:

# You can also set these variables as system environment in ~/.bashrc file


#HADOOP

HADOOP_HOME=${HADOOP_HOME:-"/appcom/Install/hadoop"}

HADOOP_CONF_DIR=${HADOOP_CONF_DIR:-"/appcom/config/hadoop-config"}

HADOOP_KERBEROS_ENABLE=${HADOOP_KERBEROS_ENABLE:-"false"}

HADOOP_KEYTAB_PATH=${HADOOP_KEYTAB_PATH:-"/appcom/keytab/"}

## Hadoop env version

HADOOP_VERSION=${HADOOP_VERSION:-"3.3.4"}


#Hive

HIVE_HOME=/appcom/Install/hive

HIVE_CONF_DIR=/appcom/config/hive-config


#Spark

SPARK_HOME=/appcom/Install/spark

SPARK_CONF_DIR=/appcom/config/spark-config


## Engine version conf

#SPARK_VERSION

#SPARK_VERSION=3.2.1


##HIVE_VERSION

#HIVE_VERSION=3.1.3


#PYTHON_VERSION=python2


################### The install Configuration of all Micro-Services #####################

#

# NOTICE:

# 1. If you just wanna try, the following micro-service configuration can be set without any settings.

# These services will be installed by default on this machine.

# 2. In order to get the most complete enterprise-level features, we strongly recommend that you install

# Linkis in a distributed manner and set the following microservice parameters

#


### DISCOVERY

DISCOVERY=EUREKA


### EUREKA install information

### You can access it in your browser at the address below:http://${EUREKA_INSTALL_IP}:${EUREKA_PORT}

#EUREKA: Microservices Service Registration Discovery Center

#EUREKA_INSTALL_IP=127.0.0.1

EUREKA_PORT=20303

export EUREKA_PREFER_IP=false

#EUREKA_HEAP_SIZE="512M"


### NACOS install information

### NACOS

NACOS_SERVER_ADDR=127.0.0.1:8848


##linkis-mg-gateway

#GATEWAY_INSTALL_IP=127.0.0.1

GATEWAY_PORT=9001

#GATEWAY_HEAP_SIZE="512M"


##linkis-cg-linkismanager

#MANAGER_INSTALL_IP=127.0.0.1

MANAGER_PORT=9101

#MANAGER_HEAP_SIZE="512M"


##linkis-cg-engineconnmanager

#ENGINECONNMANAGER_INSTALL_IP=127.0.0.1

ENGINECONNMANAGER_PORT=9102

#ENGINECONNMANAGER_HEAP_SIZE="512M"


##linkis-cg-entrance

#ENTRANCE_INSTALL_IP=127.0.0.1

ENTRANCE_PORT=9104

#ENTRANCE_HEAP_SIZE="512M"


##linkis-ps-publicservice

#PUBLICSERVICE_INSTALL_IP=127.0.0.1

PUBLICSERVICE_PORT=9105

#PUBLICSERVICE_HEAP_SIZE="512M"


########################################################################################


## LDAP is for enterprise authorization, if you just want to have a try, ignore it.

#LDAP_URL=ldap://localhost:1389/

#LDAP_BASEDN=dc=apache,dc=com

#LDAP_USER_NAME_FORMAT=cn=%s@xxx.com,OU=xxx,DC=xxx,DC=com


## java application default jvm memory

export SERVER_HEAP_SIZE="512M"


##The decompression directory and the installation directory need to be inconsistent

#LINKIS_HOME=/appcom/Install/LinkisInstall


##The extended lib such mysql-connector-java-*.jar

#LINKIS_EXTENDED_LIB=/appcom/common/linkisExtendedLib


LINKIS_VERSION=1.4.0


# for install

LINKIS_PUBLIC_MODULE=lib/linkis-commons/public-module


## If SKYWALKING_AGENT_PATH is set, the Linkis components will be started with Skywalking agent

#SKYWALKING_AGENT_PATH=/appcom/config/skywalking-agent/skywalking-agent.jar


##If you want to enable prometheus for monitoring linkis, you can set this export PROMETHEUS_ENABLE=true

export PROMETHEUS_ENABLE=false


#If you only want to experience linkis streamlined services, not rely on hdfs

#you can set the following configuration to false and for the configuration related to the file directory,

#use path mode of [file://] to replace [hdfs://]

export ENABLE_HDFS=true

export ENABLE_HIVE=true

export ENABLE_SPARK=true


## define MYSQL_CONNECT_JAVA_PATH&OLK_JDBC_PATH, the linkis can check JDBC driver

MYSQL_CONNECT_JAVA_PATH=

OLK_JDBC_PATH=
deploy-config/db.sh
#改成本机ip

MYSQL_HOST=192.168.122.24

MYSQL_PORT=3306

MYSQL_DB=dss

MYSQL_USER=dss

MYSQL_PASSWORD=123456


HIVE_META_URL="jdbc:mysql://192.168.122.24:3306/hive"

HIVE_META_USER="hive"

HIVE_META_PASSWORD="123456"
取消随机数令牌生成
将 bin/install.sh 中的 DEBUG_MODE 设置为 true
执行安装脚本
sh bin/install.sh
按提示走,遇到环境检查问题,缺什么按什么,hadoop、spark 和 hive 遇到问题先看脚本内容自己运行一遍,实在不行可以注释掉 checkEnv.sh 里的 spark 和 hive 环境检查,只要前面的 hive 和 spark 安装完的验证没问题即可

打开 20303 端口,发现 6 个微服务即可
安装 DSS 平台
创建 dss 安装目录
cd /opt

sudo mkdir dss

sudo cp wedatasphere-dss-1.1.2-dist.tar.gz dss/

sudo chown -R hadoop:hadoop dss/

cd dss

tar zxvf wedatasphere-dss-1.2.1-dist.tar.gz
配置 dss 安装环境
config/config.sh
### deploy user

deployUser=hadoop


##远程连接port

SSH_PORT=22

## max memory for services

SERVER_HEAP_SIZE=512M


### The install home path of DSS,Must provided
##修改这个变量名
DSS_INSTALL_HOME=/opt/dss/dss_install


DSS_VERSION=1.2.1


DSS_FILE_NAME=dss-1.2.1


DSS_WEB_PORT=8085


### Linkis EUREKA information. # Microservices Service Registration Discovery Center

EUREKA_INSTALL_IP=192.168.122.24

EUREKA_PORT=20303

### If EUREKA has safety verification, please fill in username and password

#EUREKA_USERNAME=

#EUREKA_PASSWORD=


### Linkis Gateway information

GATEWAY_INSTALL_IP=192.168.122.24

GATEWAY_PORT=9001


### Linkis BML Token

BML_AUTH=BML-AUTH


################### The install Configuration of all Micro-Services start #####################

#

# NOTICE:

# 1. If you just wanna try, the following micro-service configuration can be set without any settings.

# These services will be installed by default on this machine.

# 2. In order to get the most complete enterprise-level features, we strongly recommend that you install

# the following microservice parameters

#


### DSS_SERVER

### This service is used to provide dss-server capability.

### dss-server

DSS_SERVER_INSTALL_IP=192.168.122.24

DSS_SERVER_PORT=9043


### dss-apps-server

DSS_APPS_SERVER_INSTALL_IP=192.168.122.24

DSS_APPS_SERVER_PORT=9044

################### The install Configuration of all Micro-Services end #####################


############## ############## dss_appconn_instance configuration start ############## ##############

####eventchecker表的地址,一般就是dss数据库

EVENTCHECKER_JDBC_URL=jdbc:mysql://192.168.122.24:3306/dss?characterEncoding=UTF-8

EVENTCHECKER_JDBC_USERNAME=dss

EVENTCHECKER_JDBC_PASSWORD=123456


#### hive地址

DATACHECKER_JOB_JDBC_URL=jdbc:mysql://192.168.122.24:3306/hive?useUnicode=true&characterEncoding=UTF-8

DATACHECKER_JOB_JDBC_USERNAME=hive

DATACHECKER_JOB_JDBC_PASSWORD=123456

#### 元数据库,可配置成和DATACHECKER_JOB的一致

DATACHECKER_BDP_JDBC_URL=jdbc:mysql://192.168.122.24:3306/hive?useUnicode=true&characterEncoding=UTF-8

DATACHECKER_BDP_JDBC_USERNAME=hive

DATACHECKER_BDP_JDBC_PASSWORD=123456


### 邮件节点配置

EMAIL_HOST=smtp.163.com

EMAIL_PORT=25

EMAIL_USERNAME=xxx@163.com

EMAIL_PASSWORD=xxxxx

EMAIL_PROTOCOL=smtp

############## ############## dss_appconn_instance configuration end ############## ##############
config/db.sh
### for DSS-Server and Eventchecker APPCONN

MYSQL_HOST=192.168.122.24

MYSQL_PORT=3306

MYSQL_DB=dss

MYSQL_USER=dss

MYSQL_PASSWORD=123456
注意:db/dss_ddl.sql 中存在问题,需要将横线注释掉不然会报错
ERROR 1064 (42000) at line 30 in file: '/opt/dss/db/dss_ddl.sql': You have an error in your SQL syntax; check the manual that corresponds to your MySQL server version for the right syntax to use near '-------------------------------------------------------------------

------------' at line 1
如图注释掉

同样的 db/dss_dml.sql 中也有问题,需要将--线注释掉,需要注意的是,请改 db/dss_dml.sql 文件,它在 dssinstall.sh 脚本启动后会复制到 db/dss_dml_real.sql 文件
安装 dss
sh bin/dssinstall.sh
安装完成后,进入conf/dss.properties中添加数据库密码配置
wds.linkis.server.mybatis.datasource.password=123456
启动 dss
```bash
cd dss_install/sbin
./dss-start-all.sh
问题
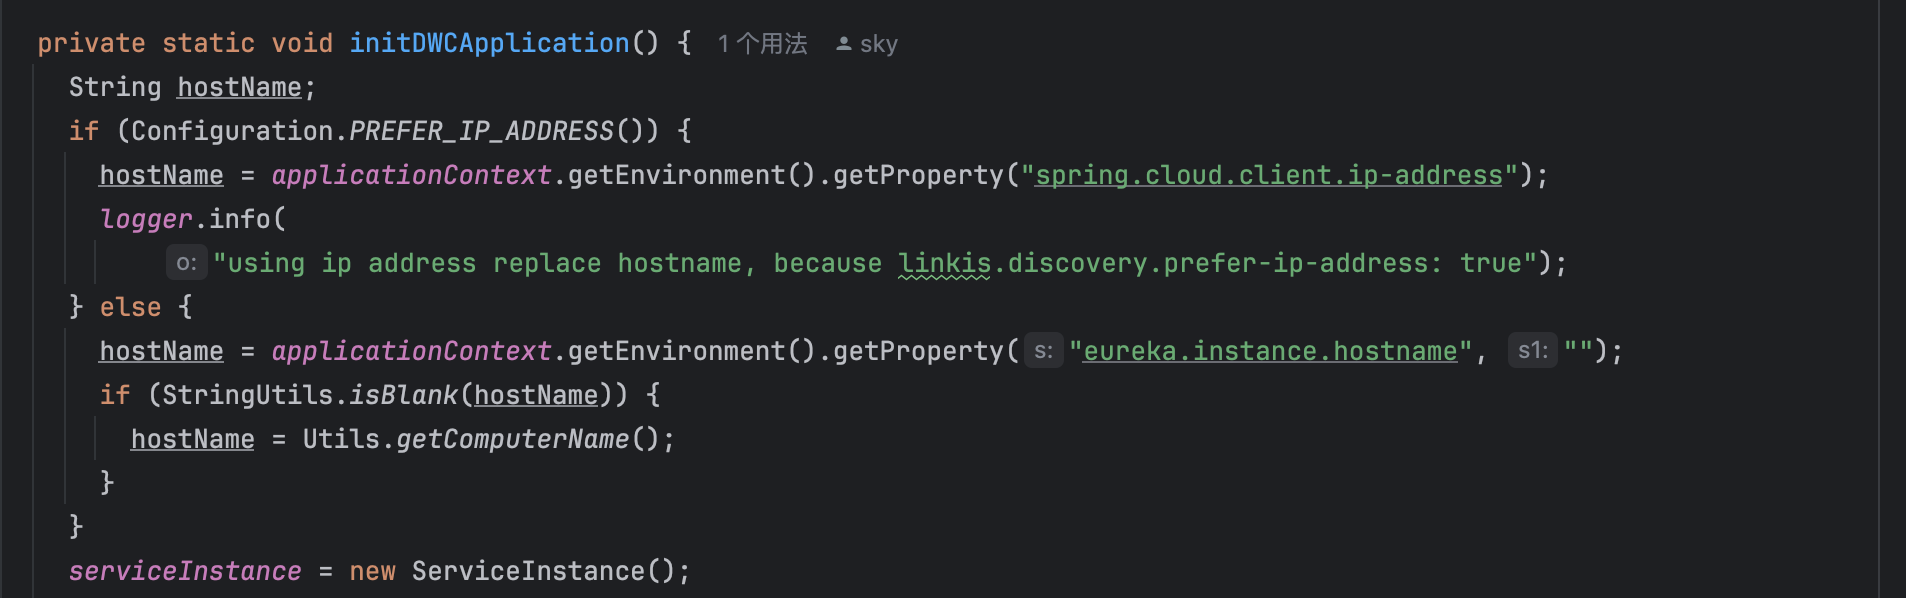
linkis-ps-publicservice无法找到"Null routeLabel got for instance : 10.197.9.75:9105"}}}. errCode: 10905
安装完成后linkis-ps-publicservice出现错误,无法找到对应的微服务,这是因为linkis-ps-publicservice微服务没有设置实例名称,默认情况下会使用主机名来做实例名:端口号
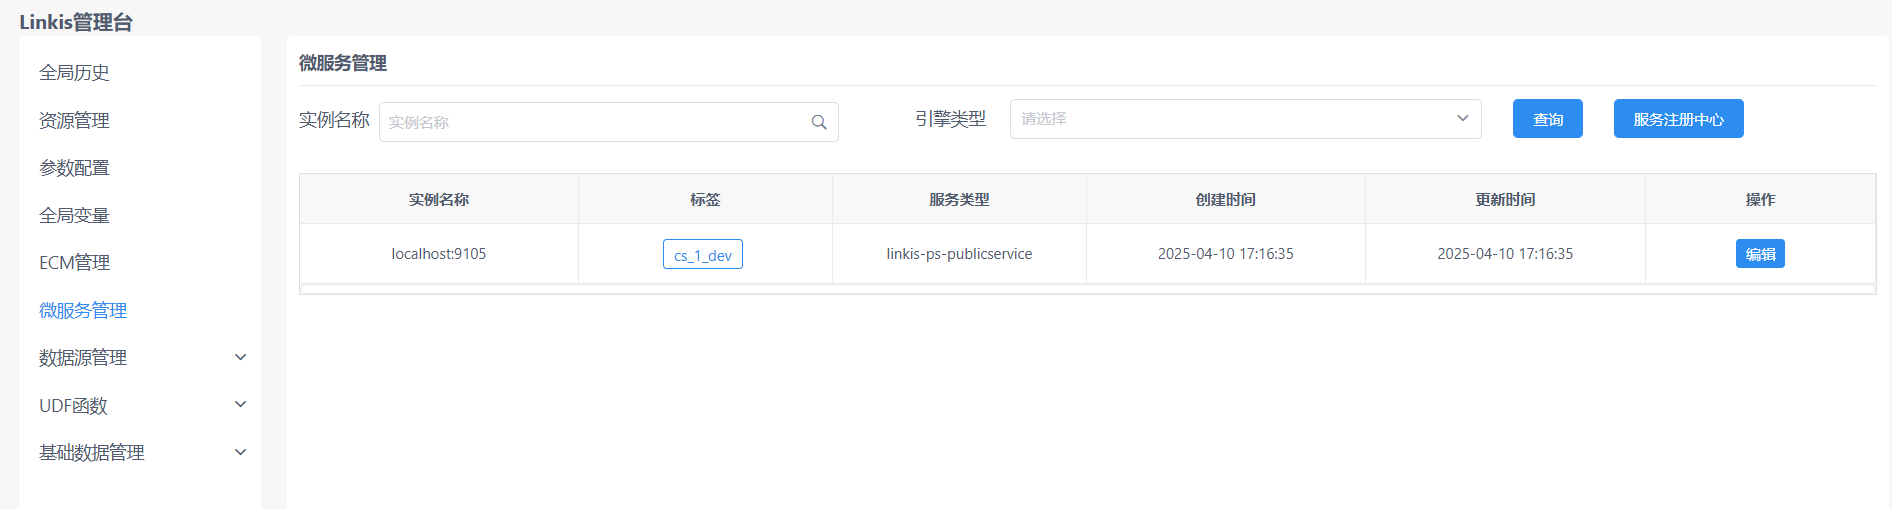
在linkis-ps-publicservice.properties配置中设置主机名
spring.eureka.instance.hostname=192.168.122.24